Ever since my first experience with kids blogging back in the spring of 2005, I’ve struggled to help kids write good comments. I think the problem arises from the comment box itself. It looks like a chat window or text box on a phone. As a result, kids seem to gravitate to writing in SMS-speak, such as “Gr8 post. CU l8tr!” Another problem is that they often want to write a comment but don’t know what to say, so they end up writing unenlightening comments such as, “I like cheese!” and “I am awesome!!!!!!!!!”
As much fun as those comments seem to be to write, they are not very exciting to receive. To that end, I’ve been revising a commenting lesson for fourth grade students for the past month. It finally went live this week. To my delight, at least in the short term, it worked.
I started with this presentation (embedded below). I worked through the first eight slides with them. There are notes for the teacher in the notes section of most slides.
Before showing the embedded video from Mrs. Yollis’ class, I draw a connection to their non-fiction critical literacy unit. One of the lessons from that unit teaches children that when you are researching a question, you are not limited to reading books at your reading level. It is okay to also read books below your reading level. What is important is that the resource is helping you answer your question.
We make that connection in this lesson to both reinforce the non-fiction critical literacy unit and to help them not feel like the video is too babyish for their sophisticated fourth grade selves.
Before they watch the video, I instruct them to try to write down at least two of the tips from the video. If they can write even more, that’s even better.
When I get to slide 9, I show them this document and point out how it has all of their notes from the video. On the second page (not shown here) I list each child’s name followed by a link to a child’s blog post. Mostly I link them to posts on blogs of other students within our school. I do this because blogging is still in its infancy at our school and I want to support our new bloggers.
(Note that this document looks much better in Google Drive. Publishing it to the web to embed here has changed its dementions.)
As students start returning to the group area with their newly drafted blog comments on sticky notes, I give each child someone else’s comment. I instruct them to write their name on the back, read the comment, and place it where they think it belongs on the rubric which I have projected on the wall.
I wanted to have each child defend the placement but there isn’t time in one 45- minute class period. Instead, we have a steady flow from comment drafting to evaluating someone else’s comment to getting feedback from me or that students regarding the comment. It is a bit chaotic but it seems to be a good balance between time available and helping them take the activity seriously. I saw number kids see their note stuck to the “Needs work” section of the rubric grab their note and walk away mutter something like, “I’ll go fix those spelling mistakes right now.”
After making suggested/needed revisions on their sticky note, students go type the comment into the blog I’ve linked them to. The first child or two who finishes early is asked to write a comment for a more difficult post. It seems that in whatever class I select there is always one student whose blog post is only one sentence long. This seems to be a good pairing since the child who finishes early is often a skilled writer. For example, today a girl wrote this comment:
She wrote it in response to this blog post. See why I love my job?
So far, I’ve taught this lesson with two fourth grade classes. In both classes, most kids were able to write a comment which met the requirements listed in the middle section of the rubric. In each class a few students wrote comments which exceeded the expectations. There were usually around 4 who need to keep working. Usually that was due to not using periods or capital, not for not having the needed content.
Most of our student blogs have very few posts at the moment. When they have more on them, I will send parents the commenting guidelines and invite them to start commenting. Hopefully they will invite other relatives and friends of the family to visit the blog and leave comments.
Please feel free to use any of my materials. If you have your own Gmail account you can make a copy of each document and save it to your Google Drive. If you do use them, please let me know how they work for you.
Inspired by articles such as this one in the Minneapolis Star Tribune, over spring break this year I purchased a walking treadmill. This post will tell you more than you ever wanted to know about it.
I checked out some manual treadmills, but they were too hard for me to move. I could never have done any work while trying to get the belt to turn. Instead, I purchased a small, walking treadmill. My wonderful husband built me a simple tray to hold my keyboard and mouse. I moved a monitor bookshelf to the front treadmill to hold a large monitor and my laptop on a stand. That done, I was ready to get to work.
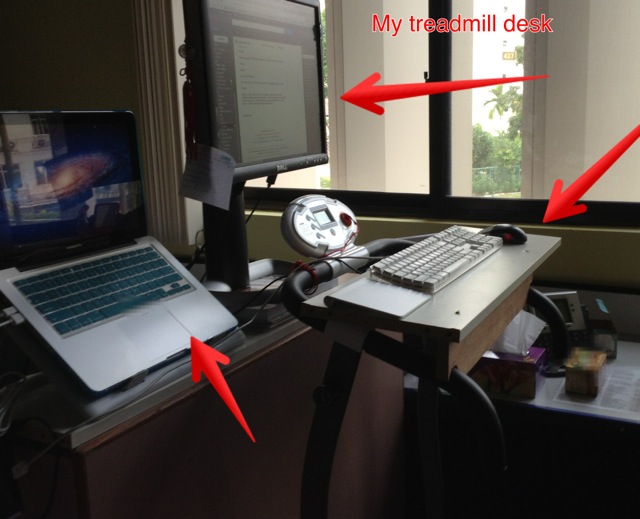
Being part of a treadmill desk is hard on the treadmill. It is more difficult for the motor of the treadmill to move slowly than quickly. They heat up more at lower speeds. As a result, this treadmill shuts itself off automatically after 30 minutes of use. If I had a full-time desk job, that would make this useless. However, since my desk work is fitted in-between classes, this works pretty well. Even when I do have an extended period of time to work at my desk, the 30 minute limit is not a problem because there are things I cannot do on the treadmill, such as budget work or fine graphic work.
For other tasks, I find I am better at them on the treadmill. For example, tedious work such as cut-and-paste work or setting up blogs is easier on the treadmill because part of my attention is being occupied by moving and not falling off. Phone calls are fine. Responding to emails are great, especially because now that I have Mountain Lion I can dictate them if I am the only one in the office. Given our crazy schedules, that happens more than you might expect.
There have been some funny moments. When I first started using the treadmill, I hadn’t realized that its quiet noise masked the sound of a door opening. Someone walked in and started talking to me nearly giving me a heart attack. Fortunately the only damage was to my pride. Another instance happened when I started wearing my Fitbit Flex. I forgot that it would vibrate when I reach 10,000 steps. Having my wrist suddenly vibrating startled me so much I yelped and almost fell off.
I no longer have the setup show in the photo. Over the summer, we went from having two people in the room to having four people in the room. That necessitated me moving my desk so that it’s now facing the windows. I could close the blinds completely but I really hate not being able to look out. Instead, I tilt them a bit but the backlighting is not optimal.
In my new arrangement, I am not able to set the laptop next to the monitor by the treadmill. As a result, I no longer use extended desktop. Fortunately, I have a new, much larger monitor so I can usually fit everything onto the screen that I need to see. Here is a very rough sketch of my new setup.
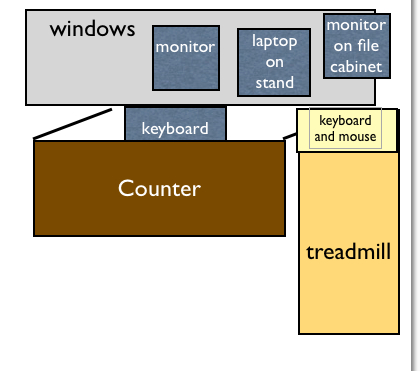
In this new arrangement I keep my laptop on the computer counter on a laptop stand. When I sit at the computer counter, I plug my desktop monitor into the laptop and extend my desktop so I can work on both the laptop screen and the external monitor. When I switch to to the treadmill, I just swap out the monitor cables so I can use as different large monitor in front of the treadmill.
When I am on the treadmill, I only mirror to this monitor since the laptop is down on the counter. Fortunately, my Macbook Pro is smart enough to remember different settings for different external monitors. My old Lenovo was not that smart. Now, I only need move my laptop if I want to dictate on the treadmill. In those instances, I just pull the laptop to the edge of the counter so that my headset cable can stretch all the way from the laptop to the treadmill.
I made a few refinements in the months I’ve been using this setup.
- I switched to using a trackball as my input device. Since my arm doesn’t need to move to operate it, that is my stable point while the rest of me is in motion.
- When I had to move the treadmill to its new location, I ended up with my back to the door. I put a small mirror on my bookshelf so that I can see the door when I am on the treadmill. The movement in the mirror warns me when someone arrives in case I don’t hear them open the door. I haven’t been startled off the treadmill since I did that. It also lets me see when the visitor is for me so I know to stop walking.
- I found an old wired Mac keyboard to use on the treadmill. It has a function key which makes it easy for me to start dictation. My bluetooth keyboard can be used on the treadmill but it lacks a function key.
- I plug most of the peripherals into a powered hub so I don’t have to swap cables when I move from treadmill to desktop.
Looking at this set up, you probably noticed I have more kit than most people. Fortunately, one of the keyboards and one of the monitors were old ones taken out of storage. Also fortunate that I had a trackball mouse in a drawer at home and the tray was made from an old IKEA shelf which we found by a dumpster. My only expenditure was the treadmill itself. I don’t remember how much it cost. I think in Singapore dollars the price was around $650.
So, has the experiment improved my health? I think so. In the past, days I spent at my desk made it difficult to reach my goal of 10,000 steps. Now if I manage to fit in even an hour on the treadmill, I end up easily reaching my 10,000 step goal by the end of the day. I’ve lost a bit of weight. My concentration is better on the treadmill, and I tedious tasks are less mind-numbing.
I’d say the only negative is that my deputy principal seems a bit worried. I think he doesn’t want to become a trend. I can’t imagine that it will. I would never have this set up in a classroom. It is only for us cubicle drones. My officemate tried to set him at ease by telling him that I was part of the electrical grid. He told him that my walking was powering the entire wing we are in. Something tells me he didn’t believe it.
Do you have a treadmill desk? I’d love to see your setup and hear about your experience.
This afternoon my poor husband re-experienced the concept that learning is social. The precipitating event was me starting to read Invent to Learn: Making, Tinkering, and Engineering in the Classroom by Syliva Libow Martinez and Gary Stager. Although he was trying to complete a number of other projects, I constantly interrupted his train of thought with my need to share what I was and learning, make exclamations, and to regaling him with fascinating tidbits of information. (Well, at least I found them fascinating.)
In an attempt to spare my husband further interruptions, I’ll try to do a bit of ruminating here instead.
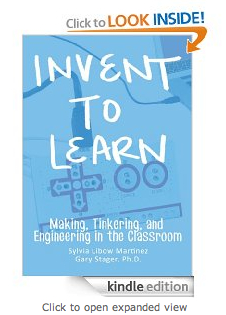
The first reason I was so compelled to share the book with him was that reading the brief history making took me back to so many of our teaching roots. I was in college in the mid-1980’s. My assignments had me reading about basal readers and Hunterization. My free time was spent reading books such as The Open Classroom Reader by Charles E. Silberman. The type of teaching championed by that book was much closer to what I’d hope to be learning in my college classes than I was finding in my assigned textbooks.
Our first teaching jobs were at a student-centered, progressive, multi-age, parent choice program. Our teaching methods were informed by the research of Piaget, Dewey, Vygotsky, and the Whole Language movement. We worked hard to teach the entire child, addressing, social and emotional development along with academic progress.
In my early years of teaching I became involved with the Minnesota TAWL network and the Network of Progressive Educators. With such progressive roots, reading the introduction was like a meet up with old friends. Revisiting my early years of teaching made me realize just how constructive our curriculum was.
- Our students created cultures complete with myths, religions and artifacts from daily life. They even buried these items. Then they turned archeologist. They dug up middens and tried to reconstruct the culture from its artifacts.
- They read complete books and shared their thoughts in book clubs when most children were reading basals.
- They created a prairie. It became an outdoor classroom where we observed and interacted with nature. When it came time to burn the prairie, we used our letter writing skills to write letters to the surrounding homes and businesses. Those letters were the most revised (and most willing revised) student writing projects in all my years of teaching.
- When we delivered some of the letters to the nearby insurance office, the workers were standing on their chairs to see over their cubical walls. They wanted to figure out why children where there. Then they rushed over with the candy dishes from their desks to welcome the children.
- They built bird houses, took part in their own Medieval festivals, used computer simulations to explore the middle ages and performed abridged Shakespeare plays.
- Our librarian taught them cross stitch. Many of the children, including sports-loving boys, gave up outdoor recess to spend time in the library learning to stitch.
- Playground problems were resolved in class meetings with children being part of the solutions. Conflict resolution skills were taught in the classroom.
- Children met weekly in K-6 family groups to build community and their emotional intelligence.
- Primary classrooms were often converted into other environments, such as a rainforest, a castle or something else that supported the curriculum.
- Children conducted inquiry projects to research topics of their own interest.
Enough of my indulgent stroll through my memories. I list them here because so many of those activities fit with the types of activities described in the introduction to Invent to Learn. Listing them reminds me of how far we’ve swung away from that type of hands-on, project based, interdisciplinary learning. In the push to increase rigor and raise test scores, the disciplines have been pulled into artificial silos. As a result, the curriculum is disconnected and too large to be reasonably taught to children. Only in school is everything departmentalized. In most real life jobs, we draw on many disciplines.
In seeing how far from that we have come, the introduction gave me hope as it promotes the idea that making is a way to return to a constructional way of teaching and learning. It also gives me hope that our curriculum can better meet the needs of all learners, especially the students who currently struggle the most because they learn differently.
Time for bed. Rumination’s on chapter one will need to wait for another day.
Our school is implementing the enVision math program. Although it has a hard cover book for students, there are also 4 worksheets/games that go with each lesson. This is both hard on the earth because of all the paper it consumes, and hard on the teachers and students who need to manage all that paper.
Bart Fabianowicz just started his second year as one of our iPad Proof of Concept teachers. He developed a method for having the students complete at least two of the worksheets using their iPads. The first step is to download each of the worksheets and a PDF and then upload it to a shared location in Google Drive. I posted step-by-step directions here. Note that we use Teacher Dashboard which among other things sets up a shared document folder in Google Drive for every class.
When the worksheets are ready, it is time to bring in the students. I’ve posted directions below to teach students what to do.
Student Directions for Completing Worksheets on an iPad
Completing worksheets on your iPad can save lots of trees since it does not use any paper. The directions below show you how to complete and turn in worksheets.
1. Search for the worksheet in the Google Drive app.
2. Open the worksheet.
3. Send the worksheet to Notability.
4. Fill out the worksheet using the pen or the typing tool in Notability.
5. Send the worksheet to your drop folder in Google Drive.
These directions should work with any worksheet your teacher has put into Google Drive as a PDF file. Keep reading to see these same directions illustrated with screen shots.
Open the Google Drive app.
Search for the worksheet.
Your teacher will tell you the name of the worksheet.
1. Type the name in the search box at the top of the screen.
2. Click on the worksheet when it appears in the Search Results.
Click the menu button in the top right corner of your screen.
Select Open In…
Click Open in Notability.
Using the Tools in Notability
Use two fingers to scroll up and down the page.
Pencil
Click on the pencil to write with your finger or a stylus.
If you click and hold on the pencil the pencil pallette appears. Ask your teacher which color you should use on worksheets. Your teacher may also tell you which color to use for correcting.
Zoom Tool
Tap and hold a spot on your page. The zoom tool will open. The zoom tool helps you write neatly.
1. Write in the big box at the bottom of the screen.
2. Your words will appear much smaller in the small box.
You can also click the magnifying glass in the bottom right corner of your screen to start zoom mode.
Click on the t to start typing. The click where you want to type.
1. A blue cursor will appear where you are going to type.
2. If the keyboard is in your way, drag it using the little lines in the bottom right corner of the keyboard.
Add a new page
Add a new page by clicking the new page button on the bottom right edge of the page.
Click the pages button to view all your pages.
Using the pages button makes it easy to jump to a different page.
Turn in your worksheet.
1. Click the share button in the top left corner.
2. Click Google Drive.
In the Destination field, locate your drop folder.
Check that the format is PDF.
Click Send to Google Drive.
As you noticed, those directions are far more detailed than most students will need. Within five minutes of opening the app most will have discovered all of that and more.
If your students do not have the Notability app, most of the notebook apps in the $7.00 range will work. Look for a notebook app with these features:
- Can import from and export to Google Drive
- Has a zoom tool to allow students to write large and have the app shrink it down to a reasonable size.
- Has a text option so students can type their responses when that is most appropriate
On one hand, this is merely a substitution type of tech integration. It is saving trees and making the papers easier to manage, so it is still worthwhile. If students are able to build models and insert photos of those models, that would raise this to an augmentation type of activity.
Back in 2006 when public wiki platforms were young, I came across one that stood out of the pack for its beauty. It was called WetPaint. When it finally opened for use, I created a open-ended project for classes called wikiPlaces. It took the well-used idea of an alphabet book and moved it to the internet where it would reach a larger audience and could include hyperlinks.
 
Over the next year or so I was enchanted to see a few classes make use of it. Then WetPaint changed. It rebranded itself as a social media site. I expected that my wikiPlaces site would eventually be deleted.
This evening I was catching up in Feedly, my new home for my old Google Reader feeds. Flipping through posts I was startled to find myself suddenly looking at edits to wikiPlaces. I hadn’t even remembered that was one of my feeds.
The old site has been monitized by Wikifoundry.com, the current owner of the old Wetpaint platform. Although the ads are obtrusive, none of them were inappropriate for a K-8 audience.
Back in 2006, not as many elementary schools had the capacity for students to edit a wiki. Now, there are better tools which allow more than one person to edit a page at a time. Therefore, I was surprised to find classes still using it. I still think the project idea was a good one. It is waiting there for you to share a place that you love.
My sister’s church used to provide the sermons in MP3 format. I was able to put them on my MP3 player and listen to them while I walked.
This summer, when I went to download the next batch I found they were no longer available in MP3 format. Instead, they were PDFs. I was sad. This was not going to work as well for me.
I clicked on the link to read the first sermon on my iPhone. Then I noticed an important button at the top of the screen. There was an option to Open in… That gave me an idea. I wondered if iBooks could read it to me.
A quick web search turned up this article. It explains how to set up Siri to read selected text. The directions worked just fine. Siri doesn’t read as nicely as the pastor does. However this should work for my purposes, especially after I slowed down Siri’s speech rate.
So, in the end my workflow looks like this.
1. Use directions above to set up Siri to speak selected text.
2. Find a PDF file online. Hold on the link and select the option to open in a new window (or in a new tab if you are on an iPad.)
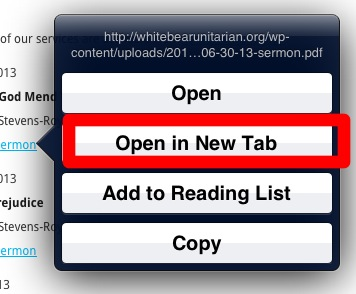
3. When the new window opens, tap in the menu bar to view the opening options. Tap the Open in “iBooks” button.

If you do not see Open in “iBooks”, then click Open in…. From there you can select Open in iBooks.
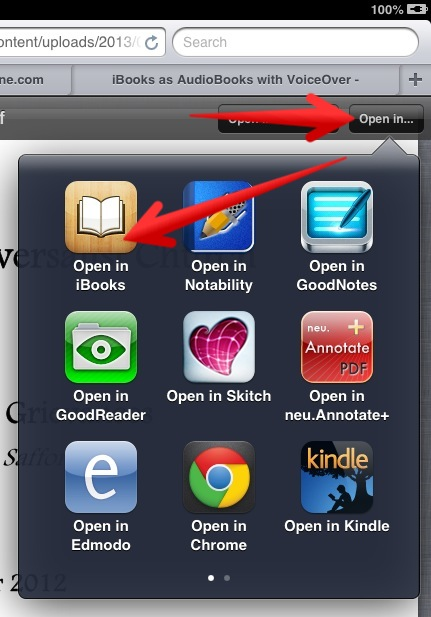
4. Select the text you want to have read aloud. Click the Speak button above the selection and the magic should begin to happen.

Note: One shortcoming is that you can only select the text on a single page. For something as short as a sermon this will not be a problem. For reading audiobooks this would be much more intrusive.
One exciting use for this is to have Siri read websites to children. Ideally we would prefer children always be reading at their own reading level. Google’s readability filters make it much easier for children to locate texts which are at their own reading level. However, when children are researching for answers to their own questions, sometimes the information is not available at their reading level. This text to speech feature could be a big help in those situations, especially when combined with the iPad’s ability to define a selected word.
|
|


