Showcasing Student Learning Online

One of my quests this year was to develop an online showcase for student projects. Five years ago, most digital student projects were word processed documents that could be printed out, or Powerpoint presentations that could be presented or printed.

Now in addition to those formats, we have podcasts, videos, Bitstrips, Voicethreads, Glogs, and other formats.  We are also starting to see more open-ended projects where teachers let students chose how to share their learning.

About a third of our teachers and specialists have their own blogs or wikis. Two of our classes are using student blogs as digital portfolios.  A number of others are using Powerpoint as a digital portfolio platform and embedding or linking to their projects.  Some digital projects can be saved as .wmv or .jpg or .mpe and dropped in our online photo galleries. The rest have been more problematic to share. For the rest of the classes we need a digital showcase.

In addition to showcasing student learning, I saw other uses for this showcase…

  • Share examples of projects with teachers during planning meetings
  • Share exemplars with students at the start of a project
  • Share exemplars with WASC accreditation teams

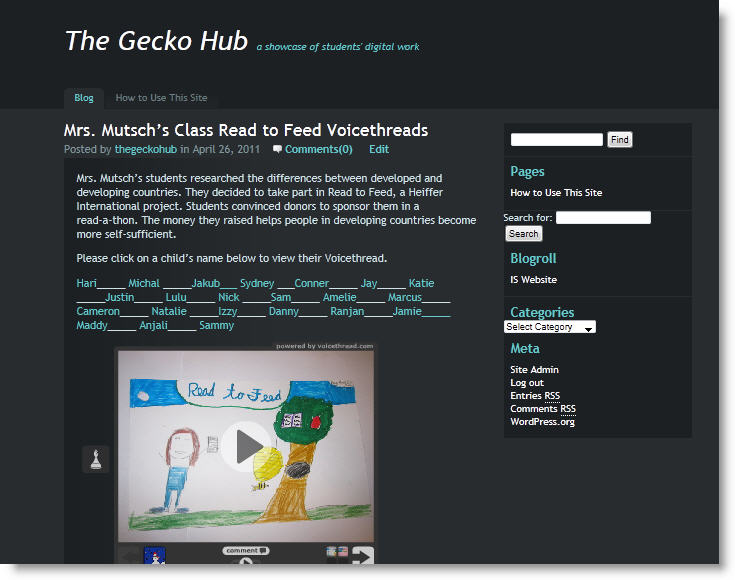
We clearly had a need, but we weren’t sure which format to choose. Our school has a Wikispaces account and an Edublogs campus account. We could make a case for either platform.  In the end we decided on Edublogs. At this time, the blog templates were better looking, and the platform was easier to work with.  You can view it here.

The Gecko Hub

Our original theme was much better looking but the font size was too small and we weren’t ready to start modifying the CSS template.  We switched to our current theme which is not nearly as attractive but the black background makes the student work pop visually.  It met our needs in terms of allowing the needed search widgets.

We set up a number of categories to allow us to search effectively.  We have categories for grade level, subject and tool type.  Now I am realizing we should add the ISTE categories as well.  Since it is the computer teacher and myself adding projects, that should be manageable.

The search field should allow visitors to search by teacher’s name, making it easier for families to use.

We are just starting to add student work to the blog.  I am liking that the newest projects appear at the top of the main page, that we don’t need to create the navigation links, and that each post really has its own “page” so teachers can add the link to their newsletters.

I am not loving the unfinished look of this theme, but I’ll leave it for now.

I am learning how to modify embed codes to make for a more attractive post. For example, embedding a full-sized glog doesn’t work very well. The right side of the glog gets cut off.  Fortunately, I can modify the embed code, making the glog appear at less than full -size.  Now I need to find that magic combination of easy to read but still fits in the blog.

Creating the posts is time-consuming. I am hoping my assistant will be able to help. Another problem may be storage.  At the end of the year we tend to clear out most student projects from our subscription services. We need a way to mark the exemplars so they don’t become dead links on the blog.

I suspect at the end of each year we need to go in an modify the posts, removing the link to each child’s project and leaving only the exemplars.

While we’ve clearly only made baby steps, it is a start. I am confident we will continue to refine it into a powerful tool. I’d love to hear how you are showcasing student work online.

Top 10 Mistakes in Behavior Change

Whether you are planning your next lesson or working on your own new year’s resolutions, take a minute to flip through these ten mistakes people make when trying to change behavior.  There is a wealth of information in this brief slideshow.

How Would You Share Student Work Online?

We had the great good fortune to have Alan November at our school for two days. One thing he said we should implement right away was an archive of student work to help teachers see what can be done.

I have been planning on setting something like that up since school started.  I wanted it for the following purposes.

  • A place to share student work with families, other classes and each other.
  • A place for students to receive feedback from an outside audience.
  • An archive to help students see what has been done in the past — they usually rise above the bar set by previous classes.
  • A repository of examples so that as teachers plan the year with us, we can “show” them what other classes have done.
  • A record of our tech integration growth. It won’t capture all our growth. Rather, it is one of many tools used for that purpose.

boy taking photograph

My first questions is format. We have Wikispaces.net, Edublogs, Blogger and Google Sites as school supported options so my first decision is blog or wiki?  I am least interested in Blogger and Google Sites due to the space limitations on our school Google Apps accounts.  I don’t think students will usually be the ones adding projects to the site since neither platform allows multiple people to work on the same page at the same time.  Can you do that with Google Sites as you can with Google Apps? If so, that could be very useful. In any case, I am leaning towards Edublogs because it has so many attractive themes. Our Wikispaces.net account has a very vanilla theme. It goes well with our corporate website, but it isn’t a look that I think will appeal to children.

Whichever I choose, I am uncertain how to organize it.  Based on my list of goals above, would you organize it purely chronologically? By grade level?  By type of project? By subject area?  Having so many goals make it challenging to choose.  As I look back over those goals, I think they are already listed in orders of importance.

If I use a blog, then the most current projects would be what you saw as you visited the site which is handy for parents and students.  This would also create an automatic chronological archive in the sidebar, making it good to show our school’s growth over time.  That is good. Will that still work if I have multiple pages?  For example, I could have different pages for different types of media.  However, when I’ve seen teachers add pages to their site, those pages are like a single entry blog post. If they want to add to it, it is all still the same post.  That is less desirable.  I would like each new project added to be posts.  That would more elegantly allow for comments on each group of projects.  Anyone know how to make Edublogs do this?

Maybe, I only have one page but use categories. I can have categories  by year, grade level, subject, and type of project.  With those categories listed in the sidebar, it would be easy to click on the grade 3 category and view work that way, click on math and see tech integration in math, or click on Bitstrips and view all the ways we used Bitstrips across the curriculum.

There are of course, student privacy concerns.  However we take those into account when we create any project that may appear online.

As you can tell, these are preliminary thoughts. Does your school have anything like this? What platform do you use? Any words of advice as I embark on this project? I’d appreciate hearing them.

Photo Credit: Oh the Irony by JP-Flanigan used with permission under a Creative Commons
Attribution-NonCommercial-ShareAlike 2.0 Generic

The Great Plan Book Migration

Back when I was a classroom teacher, I rearranged the furniture in my classroom regularly, looking for that perfect arrangement.  Now that I teach in a computer lab with desktop computers, moving the furniture is out of the question.  Maybe that is why I keep changing lesson plan books.

Other than sub plans, I haven’t kept a paper plan book in longer than I can remember.  Maybe never since student teaching.  For major planning I use an Understanding by Design inspired Word document.  However, for weekly plans for each of my 15 classes, I keep shifting what I use.

First I used Word.  Tried Exel, then went back to Word.  Then One Note became available and I loved using that.  Moving between classes was so smooth.  The first year I used it I made a tab for 2008-09 and made each teacher a page within that tab.

I was excited the next year when during my team planning with the classroom teachers, I found I had to reorganize the notebook.  For 2009-2010 each teacher had their own tab and the plans and other supporting documents such as rubrics, worksheets, etc., were separate pages within that tab.

I loved how that worked, except I could only check it on a Windows computer. That meant I kept lugging my work laptop home each night so I could work on my lesson plans.

At some point during last year our school acquired its own Google Apps.  In the interest of learning its quirks and strengths, I switched my plans from One Note to Google Docs.  The advantages were I could work on my plans on any computer with internet access. I could even check them on my iphone.  I was surprised at how often I did look them up on my phone.

However, I didn’t love this format.  Having been copied over from One Note there must have been stray bits of code that I could never find but they made some of the tables behave poorly.  Now I know I should have exported each from One Note to Word, then uploaded them to into Google Docs.

I also had significant lag and denial of access problems.  This was good in that I raised a ticket on it with our IT Help and one of the engineers fixed it by changing some network settings.  I was glad to have that problem identified and fixed before large numbers of our users began using the platform. Even with these problems fixed, I still didn’t love this option.  It felt clunky despite its advantages.

This fall, I decided to return to One Note.  I now had a little Lenovo S10-3 netbook running Window 7.  It had One Note on it which was going to make my life much easier.  I have everything set up with my lesson plans stored in a One Note notebook in Sharepoint so I could access them at work or at home.

Unfortunately, it isn’t playing well with the netbook.  Sections keep getting corrupted. They work fine on any computer at work, but on the netbook they quit syncing.  Of course, it happens the most to the sections I use the most.  Not handy.

Today as I stared in dismay as my lesson plan notebook began corrupting on the netbook, I felt like I was back at square one, needing to lug my work laptop home when my lovely Mac was already there.  Then lateral thinking kicked in an I thought of another idea.  Why not use Evernote?

In case you haven’t heard of it, Evernote is a collection of software and services that allows users to collect, sort, tag and annotate notes and other miscellaneous information.  — en.wikipedia.org/wiki/Evernote

Evernote comes in many versions.  You can have a free account or one with an annual fee with more features and more storage.  You can use it on the web by logging into their site.  You can also download their free desktop app which can work offline but syncs with the web one when it can get online.  There are also mobile versions.

All of these versions sync. This means I can access my Evernote notebooks at work on any computer there either through the web or by downloading the desktop app. Then, when at home I can access it on my Mac. I also have the free iphone app and it has worked well on there.

I have had an Evernote account for a few years.  Like One Note, I have a number of separate notebooks within it.  This summer, as part of an AppSumo deal, I was able to purchase a one year subscription to the pro version of Evernote and  a number of other online apps for the same price as the Evernote subscription usually costs so I jumped in.

One of the premium features in Evernote is the ability to have your notes on your phone.  With the free account, you must be connected to the internet to access your notes.  Now I have all my notes on my phone all the time.

Another feature is the ability to import Office files.  Since I already had lessons started in One Note, I used One Note’s Send to Microsoft Word feature.  After I had done this with the plans for each class, I emailed them to myself so I could work on my Mac instead of the netbook with its smaller screen.  If I already had Evernote on my netbook, I could have eliminated the email step.

I just made all of these changes today so I can’t tell you if this is THE solution.  I am already finding things to like about it.  One nice feature in Evernote is tags.  In addition to tagging each page with lessons2010, I also tagged them with their grade level + 2010. For example, 3rd2010.  Now I can quickly find just my third grade classes and copy information between them when they happen to be doing something similar.

I also accessed them on my iPhone. Because the lesson plans have tables, they are stored as rich text and cannot be edited on the iphone.  However, I am able to view them just fine.  I was in a similar position when the plans were in Google Docs.

I think I will miss having a tab for each teacher. I haven’t yet figured out how I will keep rubrics and other items with the lesson plans.  I can think of a number of options.  I did have to put numbers in front of the teacher names (e.g. 01., 02., 03.) to force the plans to be arranged in the order of my classes rather than alphabetically by teacher name.

I will update you later on how this works out.  In the mean time, if you have a digital lesson plan book, please tell me what you are using and how well you like it.  I need to get back to those lesson plans I was working on two hours ago.


Drive: An Animation of Daniel Pink’s New Book

I don’t want this to become a blog of other people’s videos, but this one is too good to not share.  I haven’t read any of Daniel Pink’s books, but I have had the good fortune to listen to him give a lecture on his book, A Whole New Mind which is an inspiration for any teacher.

Now he’s posted on YouTube  this amazing animation of his new book Drive: The Surprising Truth About What Motivates Us.  Its concepts run contrary to standard concepts of both economics and motivation.  However, they are not new.  A decade ago Alfie Kohn was making some of these points in his book Punished by Rewards.

As compelling as the message was the media in this video.  It feed into my recent fascination with the power of infographics. This animation is part video, part mind-map.  As the video finished my first thoughts were…

  1. I want the camera to zoom all the way out like a Prezi so I can see the big picture.
  2. I have a much better understanding from this than I would have received from a Powerpoint with the same information.

In regards to that second thought, I want to know WHY it was more effective.  Part of it was literally seeing the lines drawn between connecting ideas.  Part of it was the iconic nature of the drawings, and the combination of text, graphics and narration.  Is that all? I’m not certain.

Do you find this type of presentation more effective that a good Powerpoint or Keynote? Why?  Please leave a comment to let me know your ideas.

(Thank you to Kim Cofino for this find as well.  See why I have such love for my PLN?)

One School’s Journey into Digital Portfolios

Wow! This video is well-made and documents one school’s journey from traditional portfolios to digital ones. Thanks you for another tweet by Kim Cofino via Chad Bates for steering me towards it.

Short Portfolio Project Movie – narrated from Lawson Journalism on Vimeo.